Friday, January 29, 2016

Mudroom...complete. Master bedroom...started.

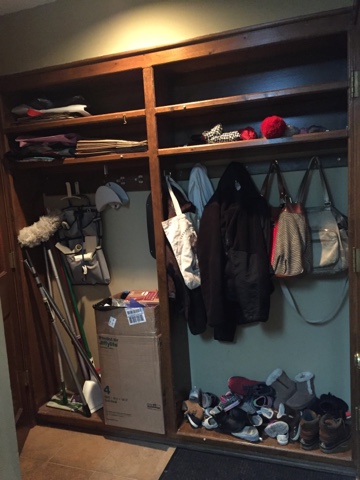
A few pics of the mudroom, already broken in and filled up.
Not too bad compared to this:
Fresh paint, shoe cubby, bigger hooks, more hooks, and a little organization. Check!

Next victim: master bedroom:
He just grabbed a corner and starting pulling. Wallpaper be gone. Well, sort of. The top layer of (painted over) paper came off easily. Typically we break out the steamer to remove the glue layer and are then ready to start patching and prepping for paint. This paper was installed on top of walls that already had several layers of paint on them, though, which made that glue layer tricky. Even after removing it, there was a rough residue.

(Supervisor Addy.)

So, we pulled off the top layer all around the room, then steamed off the lower layer, then finally we've had to go around the room and steam everything again to scrape off the glue residue AND wipe it with a scour pad. This room isn't small. The process is sticky and icky and slow.

Smooth walls on right, gluey stuff on left. Only one wall left, almost done!
The room is a mess with the furniture pulled away from the walls, but here are a couple Before shots.
Working on paint colors!
The lighting in here is the worst, but we're leaning towards a dark-ish smokey blue grey for the walls and ceiling.

To do list:
Patch, sand, prime, paint walls
Replace baseboards, window, door trim
Paint crown, maybe windows?, insides of doors 
Hire electrician to fix our light switch so it actually turns on the overhead light
Replace light switches, outlets, switch plates, vent covers 
Scrape popcorn ceiling, patch, paint same color as the walls
Replace ceiling fan, furnish!

Saturday, January 16, 2016

Mudroom refresh

After the hallway, N didn't waste any time fixing one of his biggest pet peeves about our house: shoe mountain.
And that pic above is *after* he organized/cleaned out the top few shelves.

Enter, shoe cubby. He built it with regular 1x12's from Home Depot.
Littles even got in on the sanding action.
Beadboard went in on the back, which he just cut to size then glued/nailed in, and we decided to go ahead and paint the entire built-in.
No concern about painting this wood. Beat up much?
After caulking, patching, sanding, and a coat of primer, here it is this morning after one coat of finish paint.
Lighter and brighter! Still needs final coat of paint, hardware (hooks, hooks, hooks!), and lots of baskets. :)
Looking in from the kitchen, remember the door that closed off these two spaces? We ditched it. (You can see it open in one of the pics above.) For how rarely we used it, it narrowed this space so much and made half of the built-in unusable that we decided we would be better off without it.
Finishing touches soon! Xo.


Friday, January 8, 2016

Finished hallway

A few photos of the finished hallway. Three new light fixtures in a row, updated switches and plates, and a Nest thermostat!

These were canned lights - we bought easy peasy converter kits, then installed the light fixtures as we normally would. Didn't realize how jarring the lights were before until we turned these on. Just as much light, just softer and more filtered (although pics make it look dark! Not real.).
Was worried the paint color (same as upstairs hallway and foyer in the future) wouldn't look good with the brown trim, but I think it turned out okay!
Neatest thermostat ever - it has already learned our schedule and recommended changes based on the weather. Still need to install the app on my phone, excited to play around with it.
A little mudroom built-in makeover up next. Also, cute pic of cute, tired girl, just because.
I snapped that pic and she immediately demanded "CHEESE!", so we took a selfie. ;)

Sunday, January 3, 2016

Hallway!

It's been a while since I've updated this site, but I thought I better post something, as we started (and have almost already finished) a new project!

This poor little hallway. The girls waged a war on its wallpaper, and it connects everything on the main floor. We thought making it look clean and smooth again with fresh paint and scraped ceilings, even with all of the 80's-ness that would still surround it until a bigger kitchen/living room remodel, would make a big impact.

Wallpaper and glue removed, ceiling scraped, we got to patching. This was original wallpaper - gah-ross the dust that came out of it during removal, ugh - and the walls had construction notes everywhere. Neat. :) A lot of these seemed to be measurements about the crown.
Once everything was patched, it was sanding time. Mucho plastico required.
After cleaning and caulking, paint! We worked from the ceiling down - ceiling then crown then walls. Everything received two prime coats and two finish coats. My hands hurt.

Next, new light fixturesx3, fresh white outlets and light switches, and a snazzy new thermostat. More pics to come. After we finish our smoothies.